EAST GREENLAND
Photography

Using a histogram
The histogram is a curve that shows the distribution of light in the picture. When you can see it on the screen prior to shooting, it is a great help in achieving the best exposure.
If the histogram is skewered to the left, your picture is underexposed (fig 1). If your histogram is skewered to the right, your picture is overexposed (fig 2). Figure 3 shows a histogram for a picture that is normal / correctly exposed.

Landscape photography
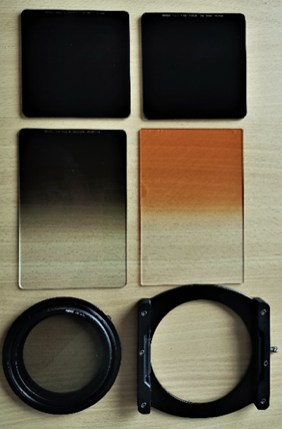
When I shoot landscapes, I use a filter holder on my objective that gives me the option of mounting more filters combined. The individual filters are simply placed in each groove on the holder.
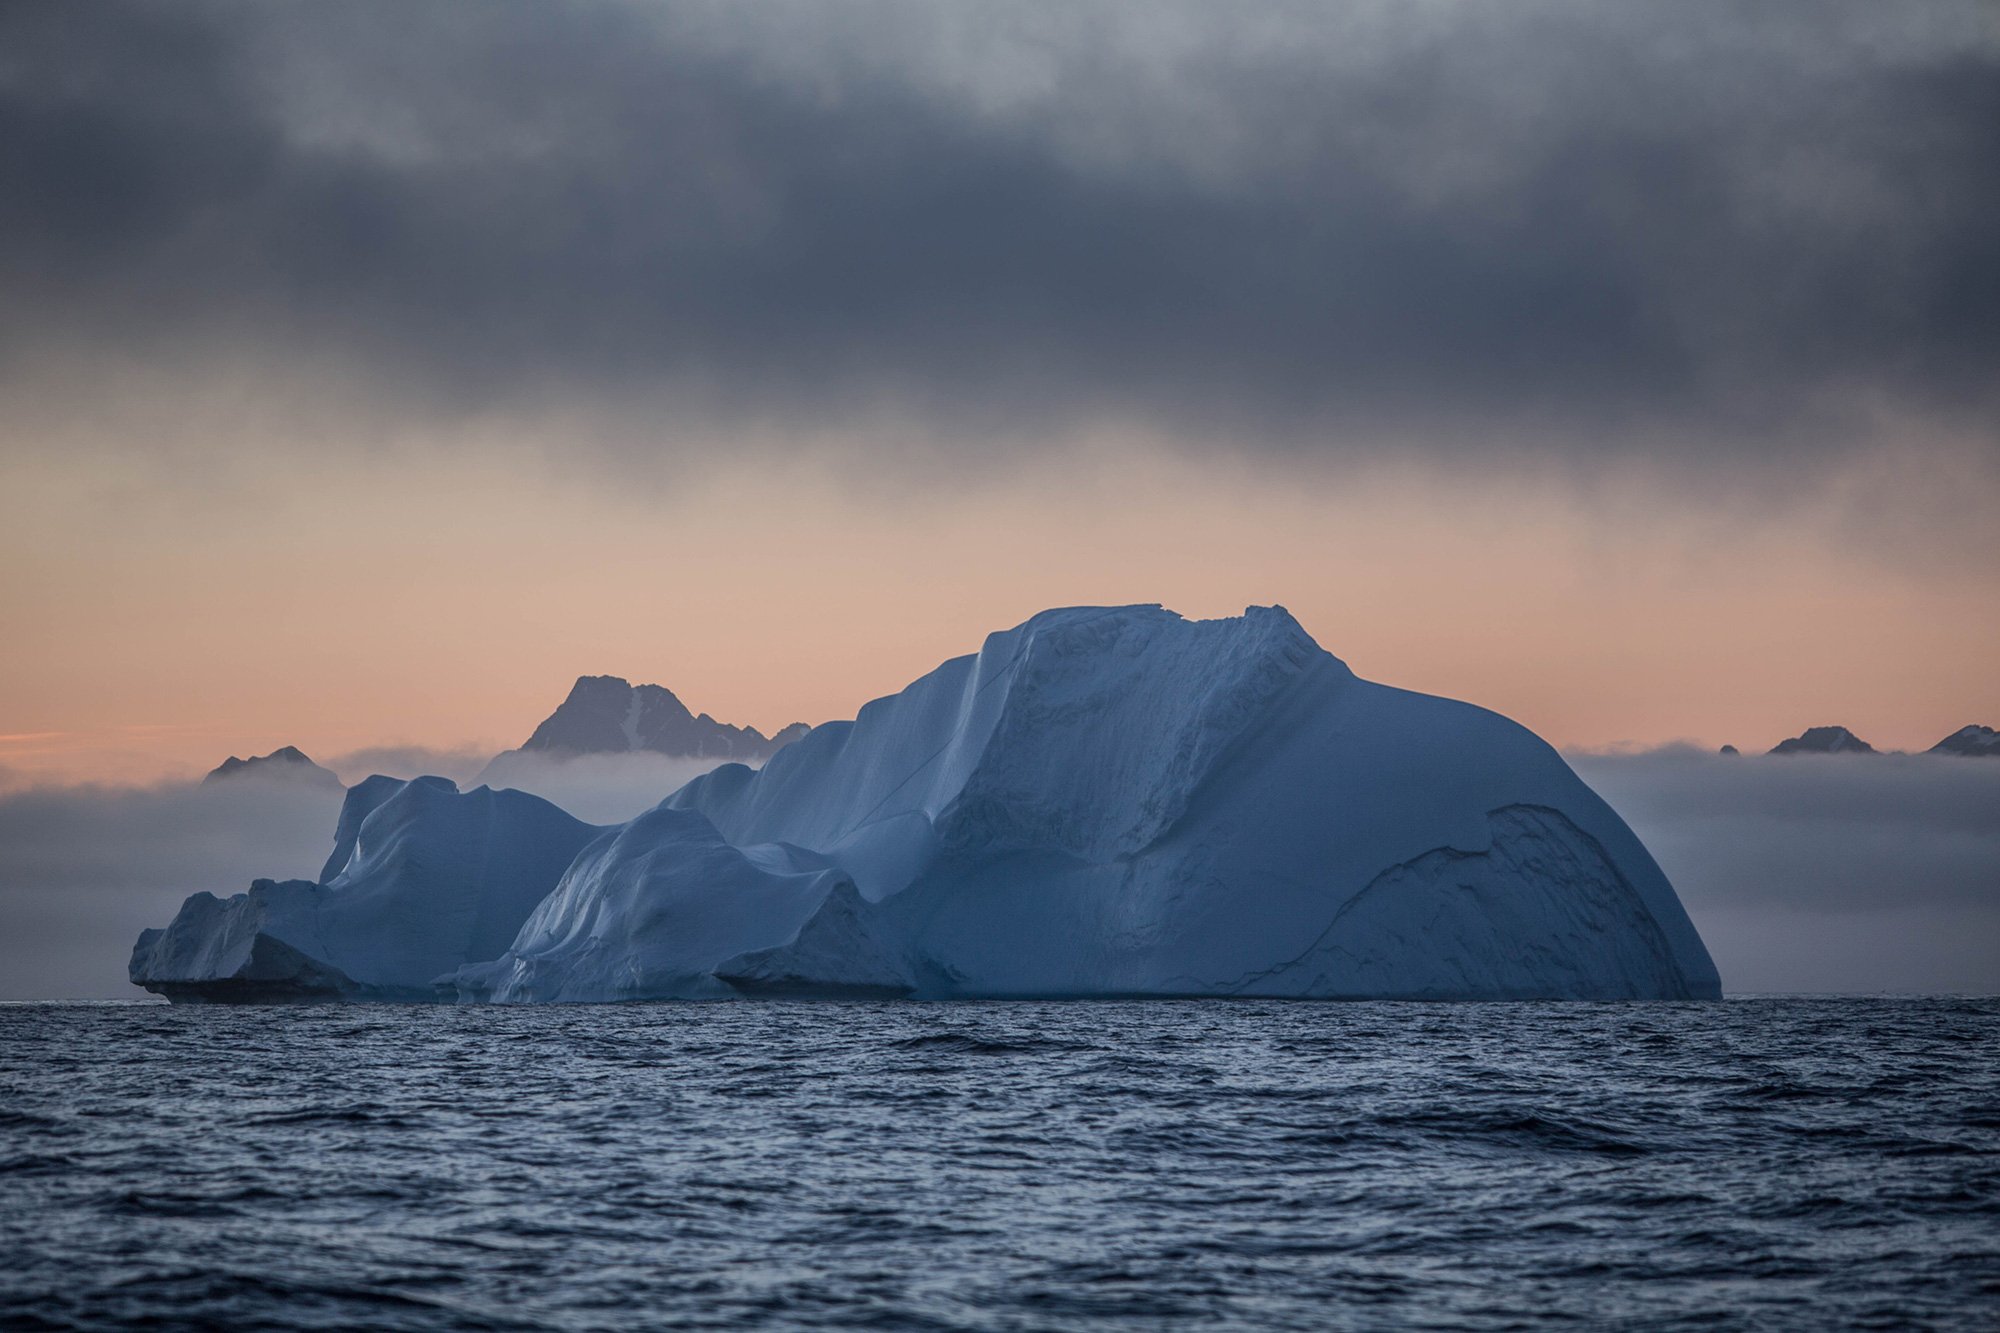
I often use my polarizing filter for landscape photography as it gives a greater saturation and contrast that I find suits landscape photographs. Sometimes I use both a polarizing filter and a soft grade filter. The latter is a filter that is darker at the top and then gradually fades to clear glass. This is makes it possible to reduce the powerful light from clouds and sun at the top of a picture while simultaneously having a normally exposed foreground.
As an example, a polarizing filter and a soft grade filter can be used in combination for good results when you are shooting icebergs and a pretty sky. The two filters will bring out the clouds more without overexposing the white iceberg.
I also often use the polarizing filter with a soft grade filter for photos of sunrises of sunsets. That way I reduce the light in the sun and the clouds while maintaining the same light in the foreground of my picture.
Soft grade filters come in different densities in the dark area of the glass. I have 0.9 (2 stop) or 1.2 (4 stop).
An ND-filter – also known as a grey filter – is a filter that reduces the amount of light that passes through the objective to the picture chip. It enables seriously long exposures even in daylight. As an example, water will seem silky smooth in 30 second exposures. White clouds will be drawn out into long stripes etc.
I have ND-filters with 6 stop and 10 stops light dimming. They can be used separately or in combination, which can give shutter speeds of more than 30 seconds, which is the cameras maximum setting. That is why I have to set my camera shutter speed setting to “B”, which is a function where the camera’s shutter stays open, until you press it again, allowing for the shutter time you want.
The Use of Filters
Polarizing filter
I often use my polarizing filter for landscape photography, as it gives a larger color saturation and contrast I find to suit landscape pictures. Sometimes I use both a polarizing filter and a soft grade filter. The latter is a filter, which is darker at the top and gradually fades to a clear glass. This allows you to reduce the powerful light from clouds and sun at the top of the picture, while still having a normally exposed foreground.
When photographing icebergs against a nice cloudy sky for example, a polarizing filter and soft grade filter combination can be advantageous. The two filters will bring out the clouds more without overexposing the white iceberg.
I also use a polarizing filter with a soft grade filter when shooting sunrises or sunsets. That way I reduce the light in the sun and the clouds, while retaining plenty of light in the foreground of my picture.
Soft grade filters come in different density in the dark area of the glass. I have a 0.9 (2 stop) or a 1.2 (4 stop).
ND filter
An ND-filter – also known as a grey filter – is a filter that reduces the amount of light that passes through the objective to the picture chip. It enables seriously long exposures even in daylight. As an example, water will seem silky smooth in 30 second exposures. White clouds will be drawn out into long stripes etc.
I have ND-filters with 6 stop and 10 stops light dimming. They can be used separately or in combination, which can give shutter speeds of more than 30 seconds, which is the cameras maximum setting. That is why I have to set my camera shutter speed setting to “B”, which is a function where the camera’s shutter stays open, until you press it again, allowing for the shutter time you want.
You can get apps that can calculate the aperture, shutter speed and iso.
Go to YouTube and search for “ND filter photography”

Back Focus button
The use of the Back Focus Button is a technique that improves your odds of getting more pictures in focus in animal photography or other activities in motion, where you need to keep focus on an object in motion. It could be a jumping whale or a polar bear in movement. (Some mirrorless cameras today have an Eye-focus function that automatically tracks animals in motion, keeping a constant focus on the animal’s eyes.
If you are looking for animal photos, I seriously recommend studying your specific camera’s options for assigning the back focus button to one of the buttons.
Here you can see a more detailed instruction on how to do it on a Canon camera:
Winter photography
When I am going out in the wither, I prepare well – amongst other things I make sure to bring an extra camera battery in my warm pants pocket, as cold reduces battery life. I also bring a good tripod, to keep my options open.
One of the problems you encounter when photographing snowy landscapes is the reflection from the snow. The camera light meter is fooled and has a hard time estimating the correct shutter speed, often resulting in boring, grey snow pictures. However, if you shoot in the RAW-format, a lot of compensation can be done on the computer afterwards, but still it is best to hit the correct exposure when recording.
A good rule of thumb is to overexpose with aperture 1.5-2 by either turning the butten for exposure compensation to +2 or by lowering shutter speed equaling to aperture steps.
With digital cameras it is easy to see on the display if you are getting a somewhat correct exposure. I usually shoot 3 different exposures with +1, +1.5 and +2 apertures overexposure respectively.
White-in-white can be very hard to make interesting in a photo, which is why it is a good idea to add a colored element. There are always options. It could for instance be a house, a colored sky by sunrise or sunset or a blue ice. The next thing is to find something that leads into the picture as a foreground – a bank of snow, a road, a piece of ice – or you can work with sections for example by using a long focal length
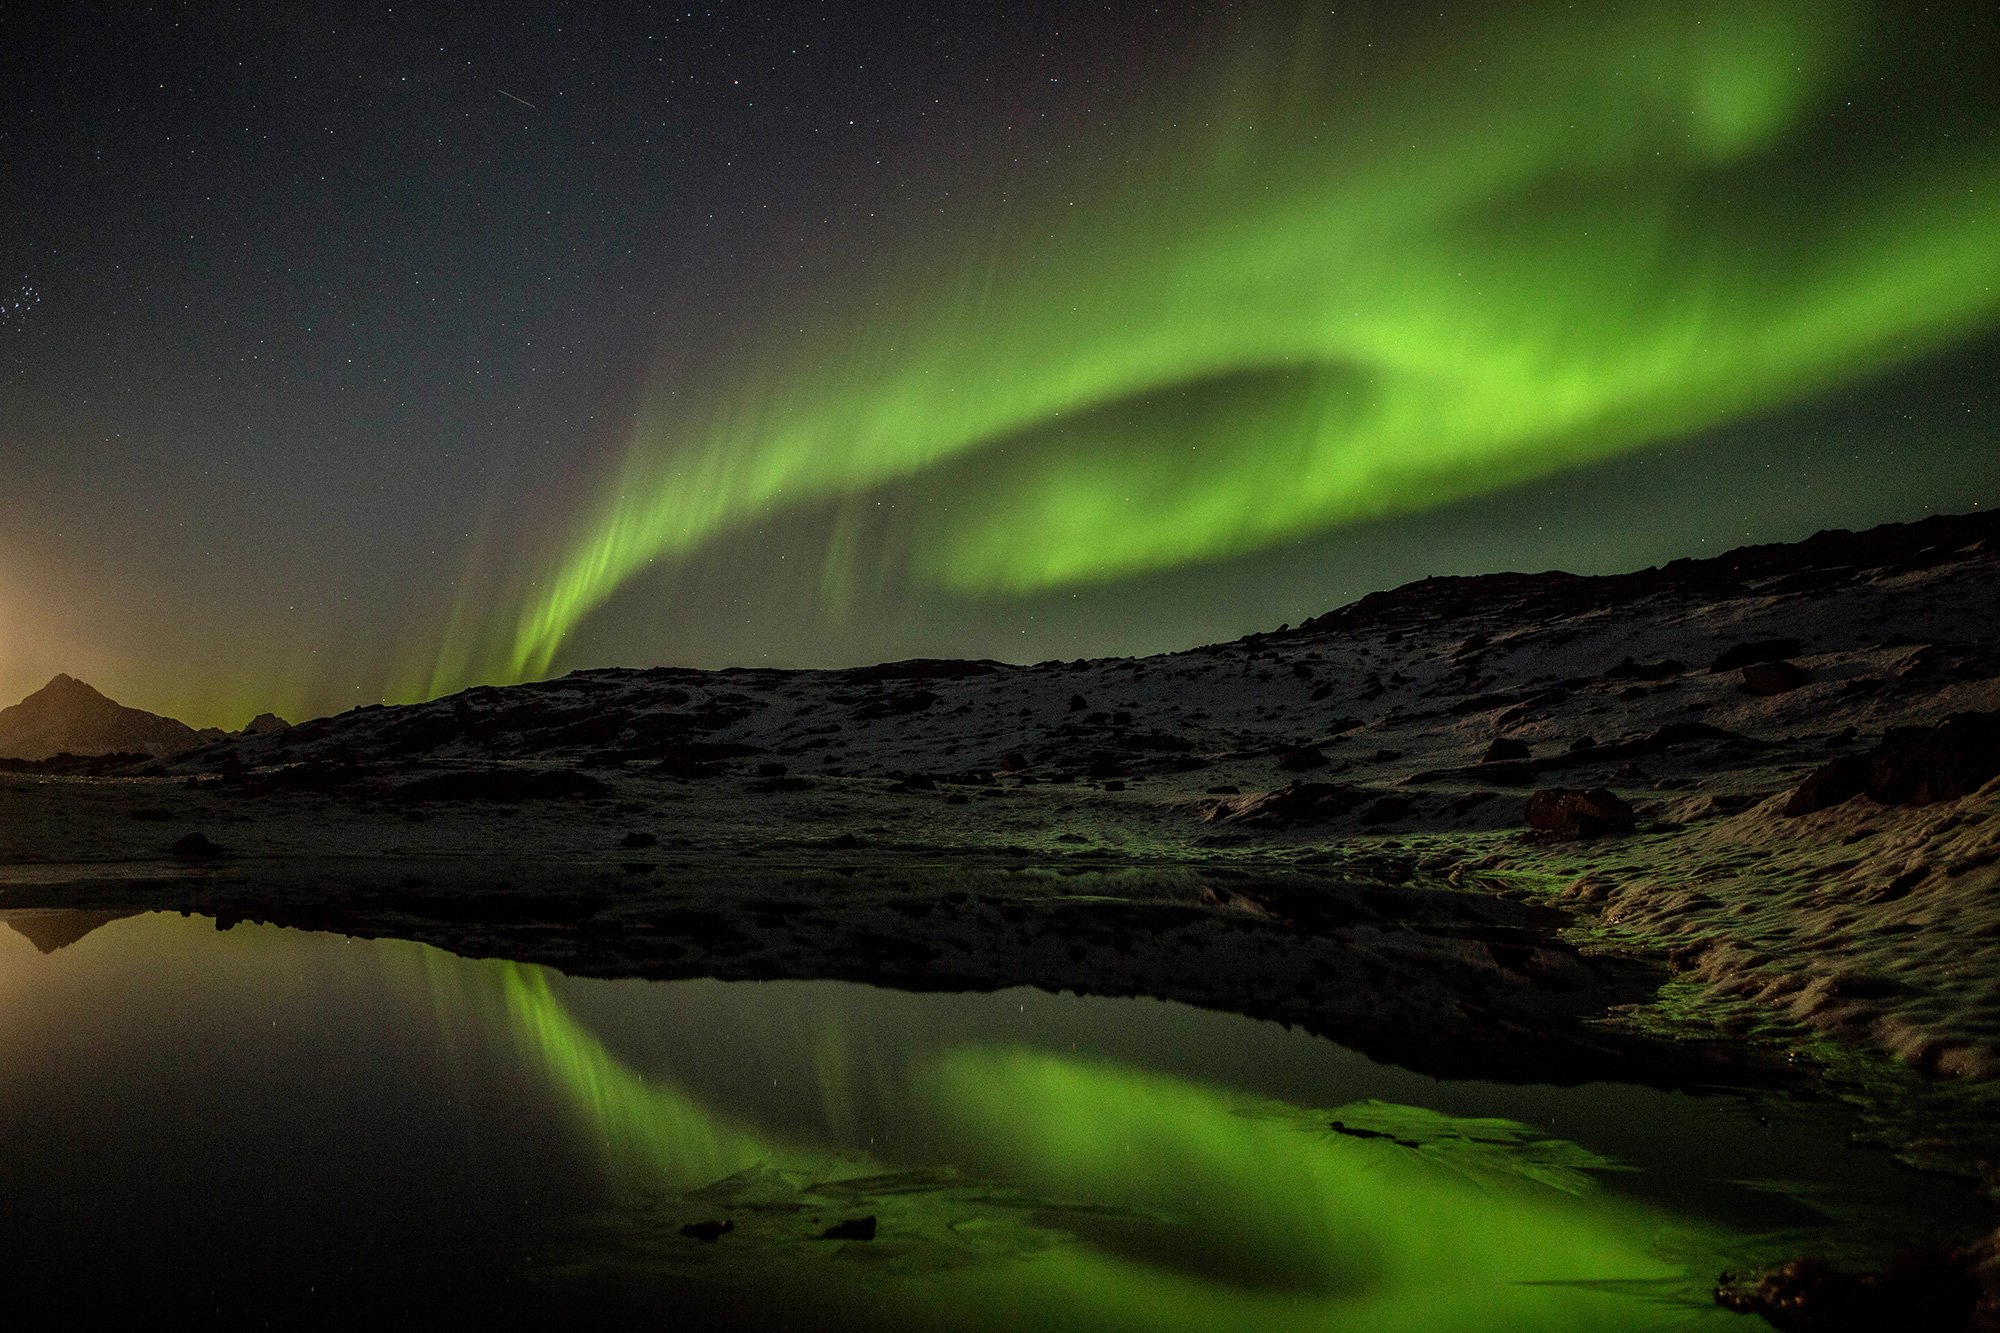
Northern Lights Photography
When recording Northern Lights, I usually focus my lens, before I leave. In Tasiilaq, for example, I focus on a lit house and then set the lens to manual focus, to keep it on the focus I have chosen. Because when you find yourself in the dark, you cannot focus on something that is a million miles away, such as the Northern Lights. You can also set the focus to “infinite”, make a small mark on your lens, where it is in focus, to make sure you are able to find your focus again. However, if you do not want that method, you can bring a powerful light, enabling you to reset your focus. It does happen that you bring home out of focus pictures, as the focus has moved by mistake.
I like doing different Northern Light pictures with different foregrounds better than simply shooting the sky – everything can work!
My favorite lens for shooting the Northen Light is a 24mm F1.4 that is a very light intense lens that allows me to keep a relatively low ISO for the least amount of noise in the pictures. A good tripod and a camera remote is a must to avoid shaking. If you do not have a remote, many cameras can be set to delayed release – for instance 5 seconds after the shutter button has been pressed. That allows you to avoid shaking as well.
You can either choose to record 5-8 seconds at a low ISO that gives a soft green Northern Light without a lot of detail, or you can choose ISO 3000 and aperture 1.4 for instance, which gives you a shutter speed of about 1 second. It is fast enough to catch the details and colors in the Northern Lights. And when you have the desired setting, try moving around trying different foregrounds such as icebergs, old boats, a river, a lake, mountains, drying rack etc. It will mostly be the same lighting for all of it.
It has just been a couple of years since I was introduced to light painting, and since then I have used it diligently – especially when I shoot Northern Lights.
The light paint technique is particularly useful, if you want a lit foreground on a Northern Lights picture. You need an LED flashlight, and the technique is that you in large soft movements “light up” the foreground, while the shutter is open. If the light from the LED flash light is too powerful, when you see the picture on the camera display, you can dim the light by holding your thumb in front of part of the beam in that way reducing the light level.
With light paint, every picture is unique. Moreover, it requires a bit of practice to create the perfect Northern Lights picture while having the foreground exactly as lit, as you want.